Genshin Impact Version 4.3 update has brought a new set of enemies for both Floor 11 in the Spiral Abyss. Since these are the topmost floors of the Abyss, ensure that you have units that are at least sufficiently built for the teams they are in. In this guide, we will explain the new changes in the current Spiral Abyss, how to clear them in the current Genshin Impact 4.3 patch update, and the most optimal teams that can be used.
Genshin Impact 4.3 Update Spiral Abyss Guide: How to clear Floor 11
Ley Line Disorders: All characters in the party gain a 60% Electro DMG Bonus. All party members receive a 60% Hydro DMG Bonus.
Chamber 1
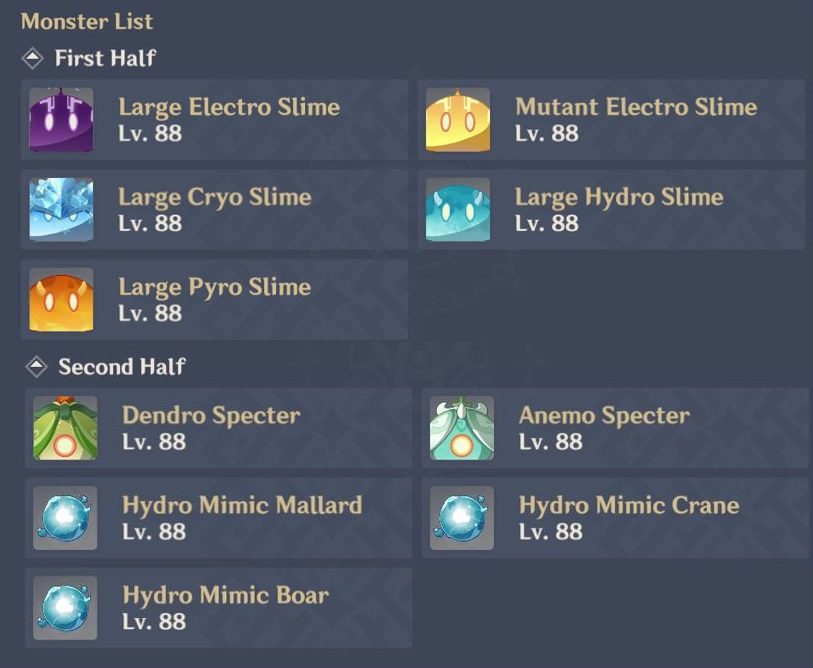
First Half
- Throughout all four waves, every enemy will direct their assault towards the monolith. Despite their exclusive focus on the monolith, this stage proves to be relatively straightforward. The manageable aspect arises from the fact that only 3 Slimes materialize in each wave, engaging in self-replication and forming a protective perimeter around the monolith. In this case, it is a necessity to employ an Anemo Crowd Control (CC) character to gather them. Simply approach the monolith in each wave and dispatch any Slimes that draw near.
- It’s crucial to keep in mind that when facing Large Pyro Slimes, it’s highly recommended to initiate elemental reactions to extinguish their Ignited state. Defeating the Pyro Slimes while they’re still ignited triggers an explosive reaction, causing damage to the monolith.
Second Half
- In the initial wave, the monolith faces an assault solely from Hydro Mallard. Upon initiating the challenge, approach the Mallard and swiftly eliminate it before distancing yourself from the monolith to draw the attention of the Specters. It’s crucial to avoid their explosions upon defeat, as these explosions can cause damage to the monolith.
- Contrarily, in the second wave, the dynamics shift. The Hydro Crane directs its attacks toward you, while the two Anemo Specters focus on the monolith. Prioritize defeating them individually, starting with the Hydro Crane, followed by Anemo Specter 1, and finally Anemo Specter 2.
- In the third wave, all adversaries converge on the monolith. If you refrain from initiating attacks (to trigger aggro), the boars typically commence by headbutting the monolith, gathering near it within seconds. Alternatively, if this doesn’t occur, dispatch the boar closest to you, leveraging the advantage of their Hydro affinity to trigger instant elemental reactions.
Chamber 2
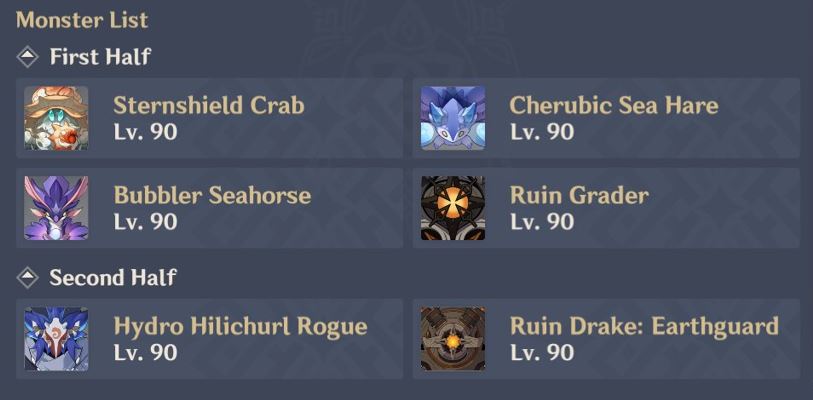
First Half
- In the initial wave, all three enemies emerge in the front area, positioned closely to each other. Notably, each creature is equipped with its elemental shield, making it advantageous to have either Anemo for Swirling those elements or Geo for Crystallizing them. Preferably, the latter option is more favorable, allowing you to benefit from the blessing buff.
- Moving on to the second wave, two Ruin Graders also spawn in the front area. The Ruin Grader possesses two vulnerable points – the cores on its head and feet. Striking one of these exposed weak points will disrupt the Ruin Grader’s ongoing attack, while successfully damaging the second weak point will temporarily immobilize the Ruin Grader for a few seconds.
- The decision to target the weak points depends on your circumstances. If time is abundant, it’s advisable to attempt paralyzing the Ruin Grader for a smoother encounter with various threats. Utilize a Bow character’s aimed shot for enhanced accuracy and an increased likelihood of hitting the cores. However, if time is limited, opting for a more direct and forceful approach is the better strategy.
Second Half
- In the initial wave, two Hilichurl Rogues materialize near each other. Fortunately, their proximity allows for a straightforward approach, especially if they align in a straight line. However, be cautious of their capability to summon Hydro Slime.
- These summoned Slimes to unleash bubbles that can ensnare you. Overcome this by defeating the Slime, which not only incapacitates the Hilichurl Rogue but also applies Hydro to them.
- In the second wave, brace yourself for the appearance of two Ruin Drakes. As they emerge, approach either one, prompting the other Ruin Drake to engage. At a certain point, this Ruin Drake initiates a charge, indicated by two devices swirling on top of its body, culminating in the dispersal of bombs into the air.
- It is highly recommended to target the glowing orange orbs at the head, the Ruin Drake’s weak point, to induce paralysis. Failing to do so results in the Ruin Drake gaining a 40% Resistance to the element it has endured the most damage from since the commencement of the battle, identifiable by the color of the bombs.
Chamber 3
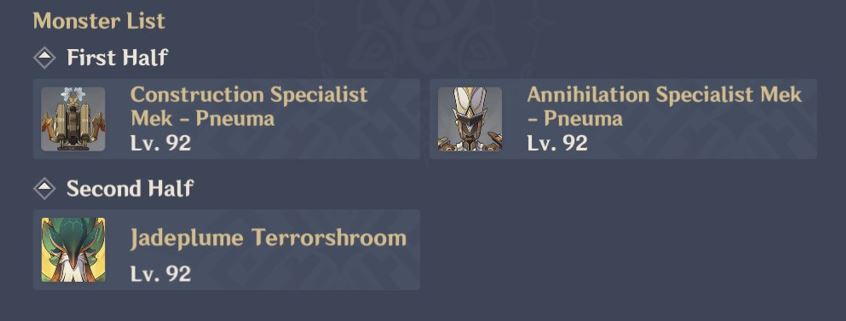
First Half
- This stage comprises a single wave, with the appearance of two Mekas in the front area. Both Mekas belong to the Pneuma-Type category, and it takes two Ousia attacks to paralyze them (two attacks specifically for the Specialist Meka, not the lower-tier Meka).
- Upon initiating the challenge, you have the flexibility to approach either Meka since both will pursue you if you stray too far. However, I recommend prioritizing the Annihilation Specialist Meka as it can summon an Area Alert Mek, which will vanish upon the demise of the Annihilation Meka.
- The Annihilation Specialist inflicts Electro damage, while the Construction Meka deals Pyro damage, leading to Overload reactions. Prepare your characters accordingly, especially if you lack shields or proficiency in evasion, as these attacks may propel your characters away.
Second Half
- The last and final wave features the formidable Jadeplume Terrorshroom. To kick off the challenge, position yourself within Jadeplume’s attack range, particularly if you’ve brought a melee DPS, as most of its attacks are short-ranged and can be dodged to evade damage. Alternatively, if you have a shielder or healer, a more aggressive approach through brute force attacks can hasten the confrontation with Jadeplume.
- Jadeplume exists in three distinct states: Normal, Activated, and Scorched. The Normal state is the default form you initially contend with. The Activated state occurs when the Fury bar beneath Jadeplume’s HP fills due to Electro attacks from your character. In this state, Jadeplume adopts different attack modes but eventually succumbs to exhaustion, experiencing a 15-second paralysis.
- The Scorched state is induced when the Jadeplume is subjected to Burning (Dendro + Pyro). While not overly problematic, this state triggers a skill that summons a maximum of 4 Fungi, potentially causing a time setback in the challenge.
- Both states have their merits, allowing you to choose the one that suits your team best. When facing the Activated state, exercise precision in avoiding Jadeplume’s formidable attacks, as they pack a significant punch. Instead, wait for the moment it becomes paralyzed before unleashing a barrage of attacks.
- For the Scorched state and the potential Fungi spores, you can thwart their emergence by obliterating them within 3 seconds using Electro, Hydro, or Pyro elemental attacks. Any of these mentioned elemental AoE attacks prove effective in this situation.
Optimal Team Comps to use on Floor 11 in Genshin Impact 4.3 Update Spiral Abyss
In Chamber 1, Leyline Monolith stages are present, but the enemies spawn nearby, making them easy to gather. If desired, you can incorporate an Anemo Crowd Control (CC) character into any of the teams, though it’s optional as their presence is not crucial. If you have only one Anemo CC character and choose to include them, it is advisable to do so in the 1st Half, as more enemies can be gathered with Anemo CC in the 1st Half compared to the 2nd Half. Keep in mind that if you plan to use a Bloom team, the explosion from the Dendro Cores will also inflict damage and reduce the Monolith’s HP.
The recommended element for the First Half is Geo. Chambers 1 and 2 feature numerous elemental enemies like Slimes and enemies with elemental shields such as Sternshield Crabs. Triggering Crystallize is easily achievable, allowing you to gain the buff from the leylines. Additionally, as there are Pneuma-type Meka enemies in the last Chamber, having an Ousia character to paralyze them with the Arkhe attack is advantageous.
For the Second Half, it is not advisable to bring Hydro or Physical DPS due to the presence of Hydro Mimics and Ruin enemies. Hydro Mimics are immune to Hydro and Ruin enemies and exhibit high resistance against Physical attacks. However, if you are confident in your DPS capabilities, you can bring them. Apart from Hydro and Physical, all other elements are suitable for this stage, allowing for flexibility in team composition with virtually any existing team composition in Genshin Impact.
F2P Team Recommendation

Advanced Team Recommendation

That’s how you can clear the Spiral Abyss Floor 11 in the Genshin Impact 4.3 update!
What are your thoughts on the guide to clear Genshin Impact 4.3 Spiral Abyss Floor 11 Update? Let us know in the comments below.
For more Mobile Gaming news and updates, join our WhatsApp group, Telegram Group, or Discord server. Also, follow us on Google News, Instagram, and Twitter for quick updates.
The post Genshin Impact 4.3 Spiral Abyss: How to Clear Floor 11 appeared first on GamingonPhone.
from GamingonPhone https://ift.tt/f695zc0


No comments:
Post a Comment